Getting Set Up
The Bokeh project encompasses two major components: the Bokeh package source code, written in Python, and the BokehJS client-side library, written in CoffeeScript and TypeScript. Accordingly, development of Bokeh is slightly complicated by the explicit compilation step required to generate deployable JavaScript.
For this reason, in order to develop Bokeh from a source checkout, you must first be able to build BokehJS. This chapter will walk you through getting a full development environment set up.
Preliminaries
Git
The Bokeh source code is stored in a Git source control repository. The first step to working on Bokeh is to install Git on to your system. There are different ways to do this depending on whether, you are using Windows, OSX, or Linux.
To install Git on any platform, refer to the Installing Git section of the Pro Git Book.
Conda
Developing Bokeh requires installing some software packages that are not
Python packages (e.g. Selenium, nodejs, etc.). To make this more manageable,
core developers rely heavily on the conda package manager for the free
Anaconda Python distribution. However, conda can also install
non-Python package dependencies, which helps streamline Bokeh development
greatly. It is strongly recommended that anyone developing Bokeh also use
conda, and the remainder of the instructions will assume that conda
is available.
To install Conda on any platform, see the Download conda section of the conda documentation.
Cloning the Repository
The source code for the Bokeh project is hosted on GitHub. To clone the source repository, issue the following command:
git clone https://github.com/bokeh/bokeh.git
This will create a bokeh directory at your file system location. This
bokeh directory is referred to as the source checkout for the remainder
of this document.
Installing Dependencies
Bokeh requires many additional packages for development and testing. Many of these are on the main Anaconda default channel, but others are only available from additional conda channels, or via the Node Package Manager.
Conda Packages
On all platforms, execute the following two commands at your command prompt to add the “bokeh” and “conda-forge” channels to your list of package sources:
conda config --append channels bokeh
conda config --append channels conda-forge
Note
If you do not wish to make configuration changes to your conda
configuration, then the channels above can be added on a per-command
basis with the -c command line option to conda, e.g.
conda install -c bokeh -c conda-forge <pkgs>
It’s also necessary to install jinja2 and pyyaml first, to bootstrap the rest of these instructions. To do that, execute:
conda install jinja2 pyyaml
From the top level of the source checkout directory, execute the following command at your command prompt to install all the required packages:
OSX / Linux
conda install `python scripts/deps.py build run test`
Note the required backticks in the command.
Windows (Powershell)
conda install $(python scripts/deps.py build run).split() | where {$_}
Winows (DOS Command Prompt)
for /F "delims=" %i in ('python scripts\deps.py build run') do (conda install %i)
Note
The test category has been omitted from the Windows installs above
because not all of the testing packages are easily installable on Windows
yet. The commands above will install everything necessary to build and run,
however. If you are interested in helping out and becoming a Windows
maintainer for Bokeh, please contact the developers.
Node Packages
Building BokehJS also requires installing JavaScript dependencies using
the Node Package Manager. If you have followed the instructions above,
conda has already installed the necessary npm and node.js
packages to your system.
Starting from the top level of the source checkout directory, execute the following commands
cd bokehjs
npm install
This command will install the necessary packages into the node_modules
subdirectory.
Typically, these instructions only need to be followed once, when you are first getting set up. Occasionally, however, dependencies may be added or changed, in which case these instructions will need to be followed again.
Configuring Git
There are a few configurations you can make locally that will help make working with the repository safer and easier.
Note
The optional instructions in this section are specific to OSX and Linux.
Git Hooks
In order to help prevent some accidental errors, here are some git hooks
that may be useful. The scripts below should be placed in the .git/hooks
subdirectory in the top level of the source checkout directory and be
marked executable with e.g. chmod +x pre-commit. For more information
on git hooks, see this turorial.
pre-commit
This git hook runs the code quality tests before allowing a commit to proceed. Note that all the standard testing dependencies must be installed in order for this hook to function.
#!/bin/bash

py.test -m quality
exit $?
pre-push
This git hook prevents accidental pushes to
masteron GitHub.#!/bin/bash protected_branch='master' current_branch=$(git symbolic-ref HEAD | sed -e 's,.*/\(.*\),\1,') if [ $protected_branch = $current_branch ] then read -p "You're about to push master, is that what you intended? [y|n] " -n 1 -r < /dev/tty echo if echo $REPLY | grep -E '^[Yy]$' > /dev/null then exit 0 # push will execute fi exit 1 # push will not execute else exit 0 # push will execute fi
Git Aliases
There are also some useful aliases that can be added to the .gitconfig file located in your home directory.
The following alias adds a git resolve command that will automatically open up your editor to resolve any merge conflicts.
[alias]
    resolve = !sh -c 'vim -p $(git status -s | grep "^UU" | cut -c4-)'
You can replace vim with whatever your favorite editor command is.
Building and Installing
Once you have all the required depencies installed, the simplest way to
build and install Bokeh and BokehJS is to use the setup.py script at
the top level of the source checkout directory.
The setup.py script has two main modes of operation:
python setup.py install
Bokeh will be installed in your Pythonsite-packagesdirectory. In this mode, any changes to the python source code will not show up untilsetup.py installis run again.
python setup.py develop
Abokeh.pthpath file will be written to your Pythonsite-packagesdirectory that points to thebokehsubdirectory of your source checkout. Any changes you make to the python source code will be available immediately without any additional steps.
With either mode, you will be prompted for how to install BokehJS, e.g.:
python setup.py develop

Bokeh includes a JavaScript library (BokehJS) that has its own
build process. How would you like to handle BokehJS:

1) build and install fresh BokehJS
2) install last built BokehJS from bokeh/bokehjs/build

Choice?
You may skip this prompt by supplying the appropriate command line option
to setup.py, e.g.
python setup.py develop --build-jspython setup.py develop --install-js
Note that you will need to build BokehJS any time that the BokehJS source code changes (either by you or by pulling new revisions from GitHub). In particular, at the very least, you must build BokehJS the first time you install.
Note
Occasionally the list of JavaScript dependencies also changes. If this occurs, you will also need to re-run the instructions in the Node Packages section above.
Next Steps
You can check that everything is installed and set up correctly by executing the command:
python -m bokeh info
You should see output similar to:
Python version      :  3.6.1 |Anaconda, Inc.| (default, May 11 2017, 13:04:09)
IPython version     :  5.3.0
Bokeh version       :  0.12.7dev3-17-g184f1ed7a
BokehJS static path :  /Users/bryan/work/bokeh/bokeh/server/static
node.js version     :  v6.10.3
npm version         :  3.10.10
The next check that can be made is to run some of the examples. There are different ways in which bokeh can be used which suit a variety of use cases.
To create an html file,
BOKEH_RESOURCES=inline python examples/plotting/file/iris.py
which will create a file iris.html locally and open up a web browser.
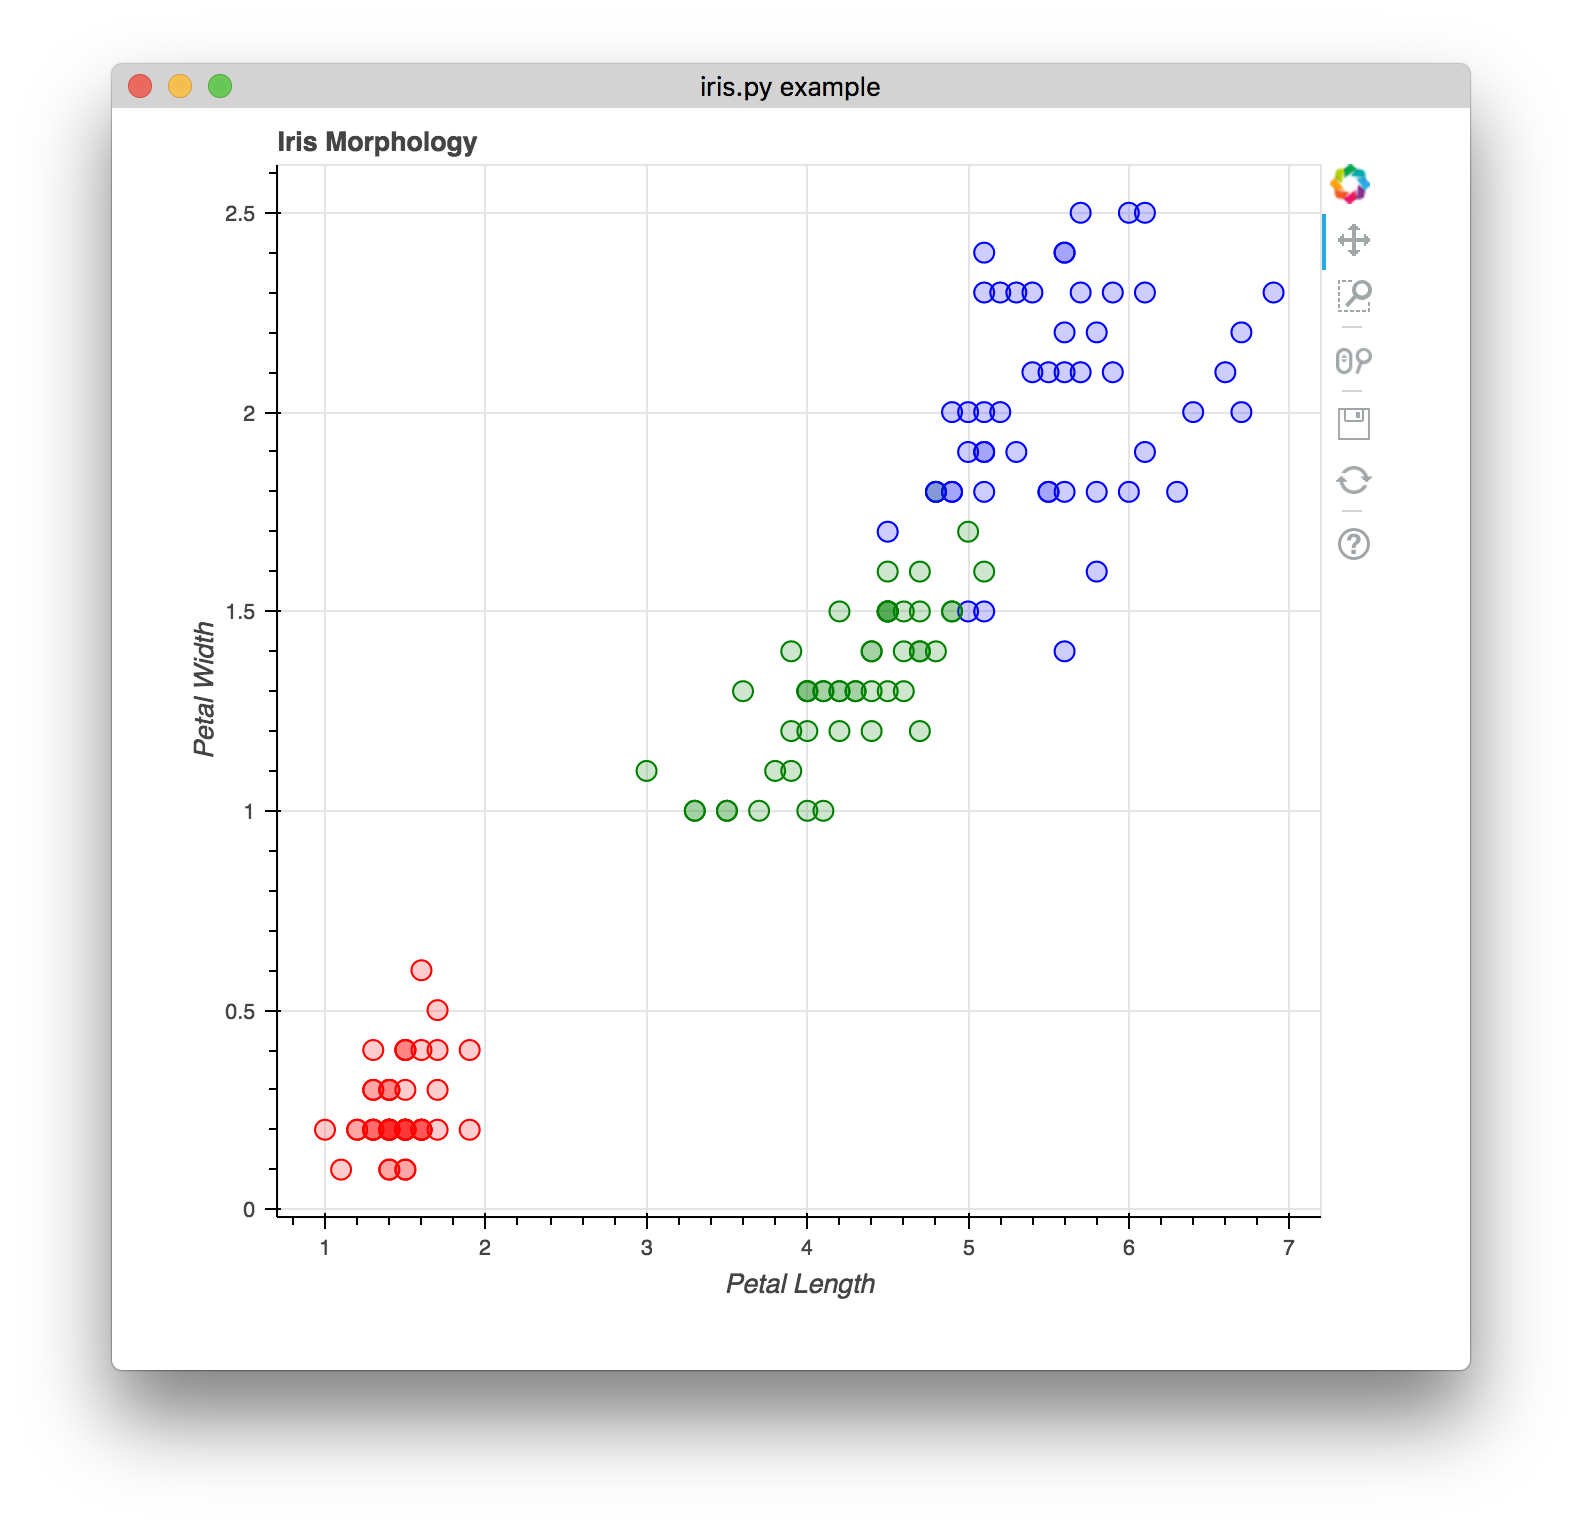
The variable BOKEH_RESOURCES determines where the css and JavaScript
resources required by bokeh are found. By specifying inline we are using
the version of BokehJS we just built to include the resources inline as part of
the html file. The BOKEH_RESOURCES variable is required as the default
behaviour is to use CDN resources.
Another method of running bokeh is as a server. An example of this mode of operation can be run using the command
python -m bokeh serve --show examples/app/sliders.py
which will open up a browser with an interactive figure.
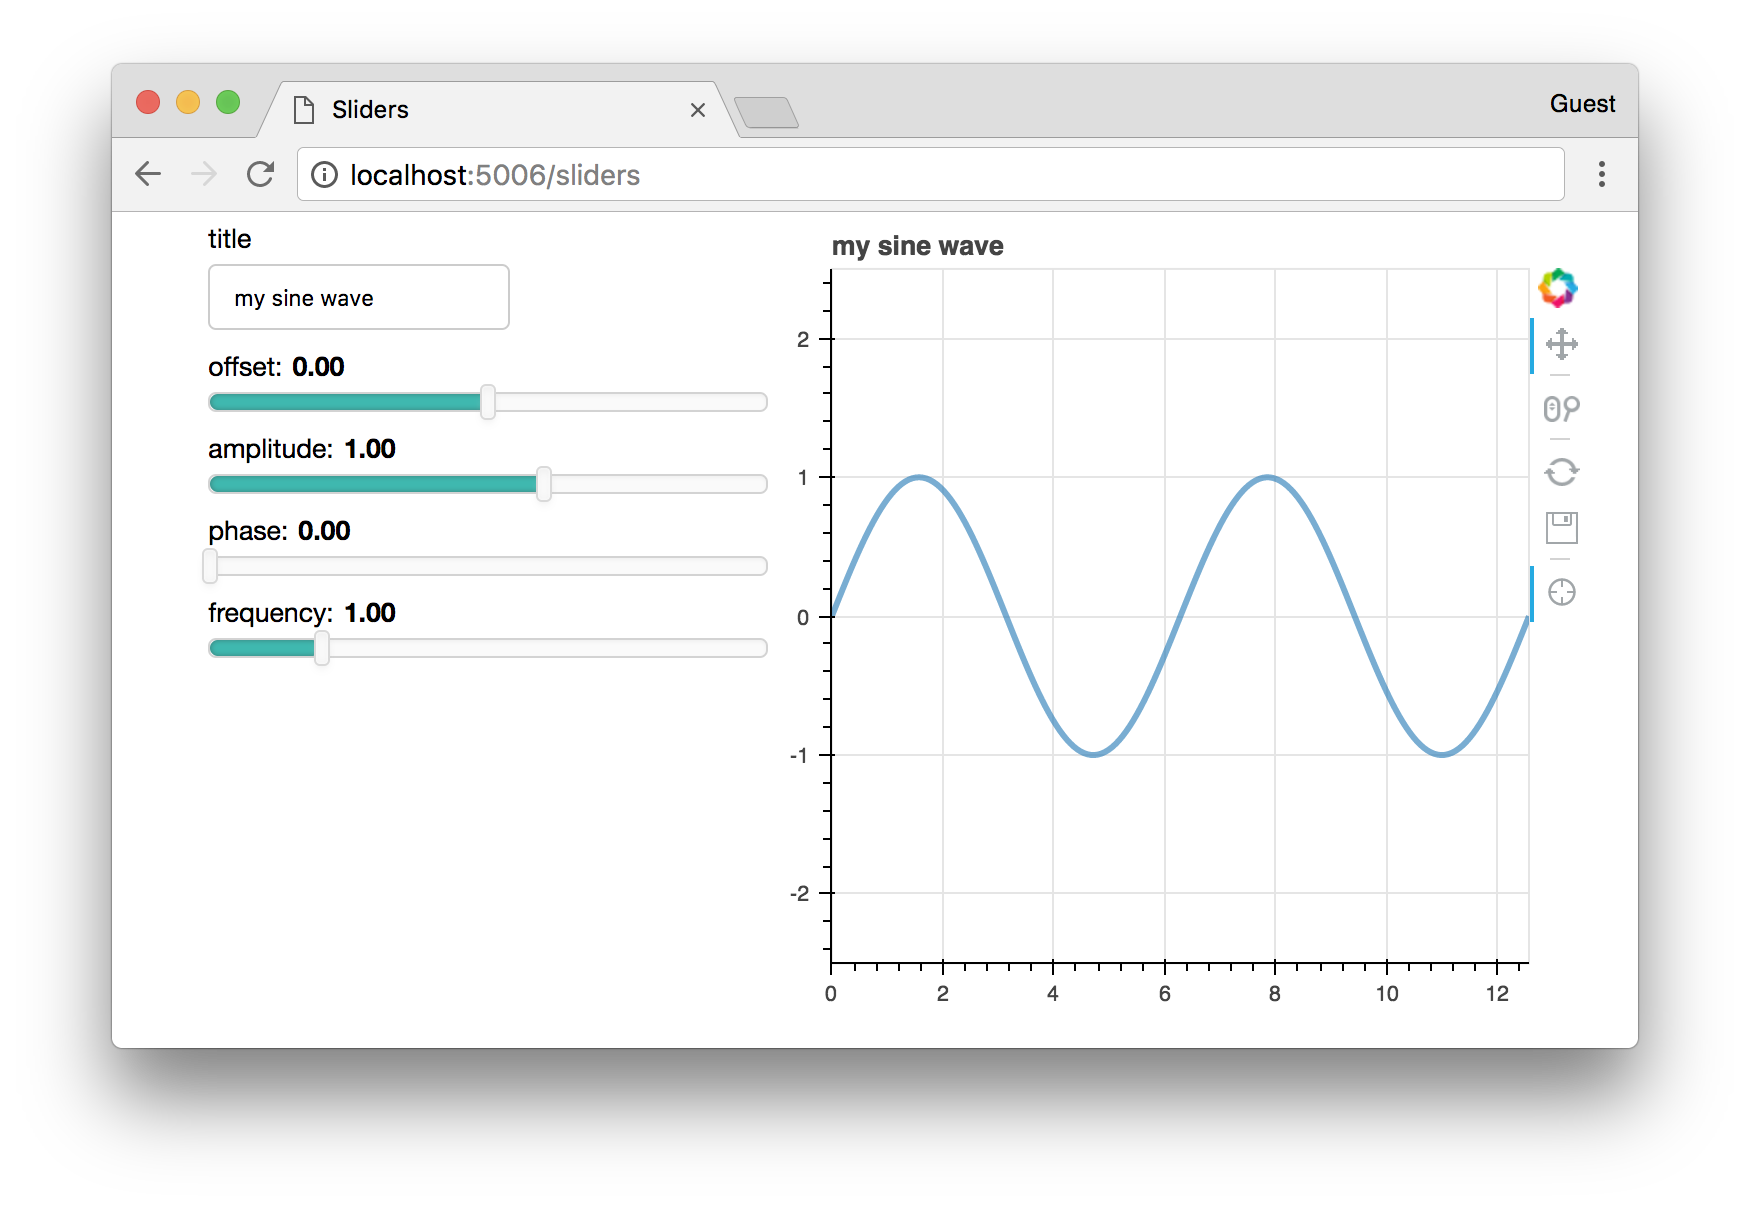
All the sliders allow interactive control of the sine wave, with each update
redrawing the line with the new parameters. The --show option opens the
web browser to the appropriate address, the default is localhost:5006.
If you have any problems with the steps here, please contact the developers.