Using the Bokeh Server
The Bokeh server is an optional component that can be used to provide
additional capabilities, such as:
- hosting and publishing Bokeh plots for wider audiences
- streaming data to plots so that they automatically update
- interactively visualizing very large datasets by employing downsampling and abstract rendering
- building and deploying dashboards and apps with sophisticated user interactions
The Bokeh server is built on top of Flask. Bokeh
ships with a standalone executable bokeh-server that you can easily run,
and you can also embed the Bokeh server functionality inside another Flask
server using the Bokeh Server Flask Blueprint.
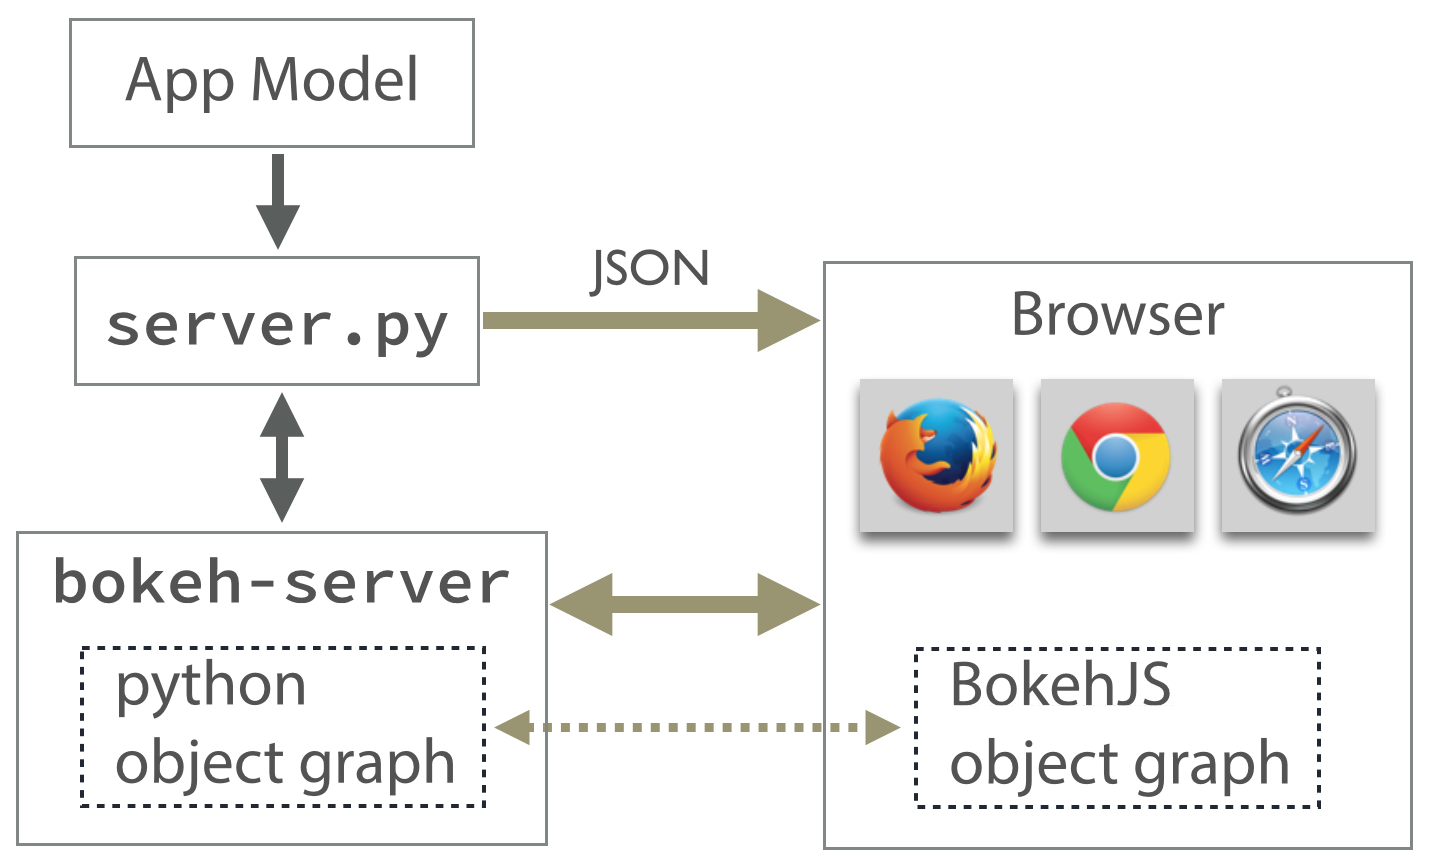
The basic task of the Bokeh Server is to be a mediator between the original data
and plot models created by a user, and the reflected data and plot models in the
BokehJS client:

Here you can see illustrated the most useful and compelling of the Bokeh server:
full two-way communication between the original code and the BokehJS plot.
Plots are published by sending them to the server. The data for the plot can be
updated on the server, and the client will respond and update the plot. Users can
interact with the plot through tools and widgets in the browser, then the results of
these interactions can be pulled back to the original code to inform some further
query or analysis (possibly resulting in updates pushed back the plot).
We will explore the capabilities afforded by the Bokeh server in detail below.
Bokeh defaults to single user mode - where every request is automatically logged in as a user with username defaultuser. However for teams, and for plot publishing, it makes more sense to add an authentication layer. This way users won’t be able to overwrite each other’s plots.
To do enable multi user mode, You need to turn on the multi_user bokeh server setting. This can be done using the command line parameter -m. Once this is done, all scripts that use the bokeh server must authenticate with the bokeh server. A user can be created with:
session = Session(root_url=url)
session.register(username, password)
Or logged in with:
session = Session(root_url=url)
session.login(username, password)
The bokeh client library will store authentication keys in the ~/.bokeh directory, so that in subsequent invocations, logging in is not necessary
For plot hosting, we generally recommend running the server in multi user mode. See the Authentication section for instructions on how to do this.
Once a plot is created, you have to publish it. Assuming you have a session that is authenticated against a document:
session = Session()
session.use_doc('mydocument')
#do some plots here
session.publish()
Or if you are using output_server:
output_server('myplot')
#make some plots
cursession().publish()
A public link to a plot on the bokeh server page can be viewed by append ?public=true To the url - for example if you have the url to a plot http://localhost:5006/bokeh/doc/some-doc-id/some-plot-id, You can generate a public link to the published plot using http://localhost:5006/bokeh/doc/some-doc-id/some-plot-id?public=true. In addition, the autoload_server function call in bokeh.embed also takes a public=true keyword argument, which will generate an embeddable html snippet that will load the public version of a given plot
The bokeh-server application has some command line options for
general usage, setting the server port and IP, for instance:
-
-h, --help
show this help message and exit
-
--ip <IP>
IP address that the bokeh server will listen on (default: 127.0.0.1)
-
--port <PORT>
port that the bokeh server will listen on (default: 5006)
-
--url-prefix <URL_PREFIX>
URL prefix for server. e.g. ‘host:port/<prefix>/bokeh’ (default: None)
Additional configuration options for configuring server data sources,
multi-user operation, scripts, etc:
-
-D <DATA_DIRECTORY>, --data-directory <DATA_DIRECTORY>
location for server data sources
-
-m, --multi-user
start in multi-user configuration (default: False)
-
--script <SCRIPT>
script to load (for applets)
Bokeh server supports various different backends for data storage:
- In-Memory — non-persistent, useful for testing
- Shelve — lightweight, available on all platforms
- Redis — recommended for production deployments
Note
Redis can be more difficult to install on Windows, please consult
Notes for Windows Users for some additional notes.
Additional backends may be added in the future if need or demand arises, or
if they are contributed by the community.
You can specify the backend when starting the Bokeh server by supplying
the --backend command line argument:
-
--backend <BACKEND>
storage backend: [ redis | memory | shelve ] (default: shelve)
For example:
$ bokeh-server --backend=memory
When using the redis backend there are some additional options
available:
-
--redis-port <REDIS_PORT>
port for redis server to listen on (default: 7001)
-
--start-redis
start redis automatically
-
--no-start-redis
do not start redis automatically
By default bokeh-server will start Redis automatically when the
redis backend is chosen.
The Bokeh server uses websockets for communication between the server
and browser clients. There are several options for configuring the
use of websockets:
-
--ws-conn-string <WS_CONN_STRING>
connection string for websocket (unnecessary if auto-starting)
-
--zmqaddr <ZMQADDR>
ZeroMQ URL
Typically these values do not require much attention. By default,
bokeh-server automatically starts a ZeroMQ websocket worker.
-
-d, --debug
use debug mode for Flask
-
--dev
run server in development mode: -js –backend=memory
-
--filter-logs
don’t show ‘GET /static/... 200 OK’, useful with –splitjs
-
-j, --debugjs
serve BokehJS files from the bokehjs build directory in the source tree
-
-s, --splitjs
serve individual JS files instead of compiled bokeh.js, requires –debugjs
-
--robust-reload
protect debug server reloading from syntax errors
-
-v, --verbose
